Grab Our Blinkie

Groups We Love

Certified

Lifetime Member

Favourite Blogs


Saturday, July 19, 2014
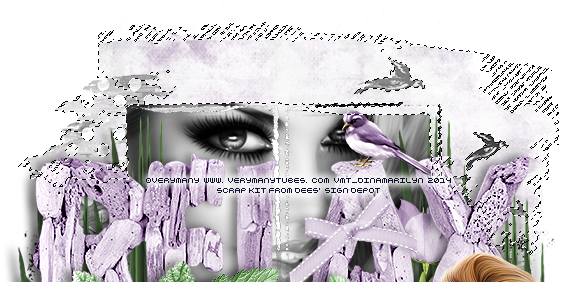
PTU Tutorial RELAX

This tutorial was written by me on July 19, 2014 using Photoshop CS6 but any version will work.
Any resemblance to any other tutorial is pure coincidence.
SUPPLIES:
I used the artwork of Verymany. Tube can be purchased HERE.
You must purchase a license to be able to use their tubes.
I used PTU kit Thistle N Chiffon from Dees'Sign Depot. You can buy it HERE.
I used Mask from Fran. Masques 2/Masks 2 which can be downloaded HERE.
Fonts - I used Qwigley FTU and BOSSHOLE FTU font.
Open the tube file. Close all layers except original tube layer, top_2 and stockings_2.
Both of the clothes should be in blue color.
Select top_2 layer, go to IMAGE > ADJUSTMENTS > HUE/SATURATION
Apply setting as shown below on the image:

Do the same with stockings_2 layer. Now you should have nice purple color.
Marge all layers. Open new canvas : 700x700 px size.
Move tube on the empty canvas. Make sure your tube layer is selected, hold CTRT + T.
At the top you will see new tab, underneath Options tab.
At the moment setting are as follows W: 100% and H: 100%
Change them to W: 40% and H: 40%. Press ENTER.
Place tube in the middle, as you can see on the tag.
Create new layer. Move layer underneath tube layer.
Now we are going to draw shadow. It is really easy.
Use any brush you like, I prefer Hard Round type of a brush which I used for drawing shadows.
Make sure selected color is grey, I used #302c2c.
Draw bold lines like shown on the image below:
* When I say bold, make it bold, don't follow line of the tube, cross it.
Once you apply GAUSSIAN BLUR you will end up having white spots and we don't want that,
so make sure you have everything covered.

After you draw lines underneath your tube, go to FILTER > BLUR > GAUSSIAN BLUR
Apply GAUSSIAN BLUR 4 or 5 times. Apply same effect till you dont get desired effect.
Your shadow should look like this:

If you get messy look, click on Eraser Tool, select Soft Round brush and remove messy edges.
That is all.
Open kit folder. Take Element_26 from the kit, place it on the middle behind the tube.
Hold CTRL + T and resize it for W: 80% and H: 80%. Press ENTER.
Apply DROP SHADOW like this:

I used Element_64 and Element_73 on left and right side in front of RELAX wordart.
I added Element_2 - bow on letter A. As well Element_71 - bird on wordart.
Add Element_6c, Element_5 andd Element_88 in front.
Add grass, Element_73 under the tube.
I applied shadow on each element as I did on RELAX wordart.
As well I used Sharpen effect on every element.
*Use my tag as guidance.
Open mask folder. Place FRg_Masques 2_M3 mask at the bottom of the layer palette.
Select Magic Wand Tool, select black rectangle on the mask with Wand Tool.
Like this:

Move mouse over selected area RIGHT CLICK > LAYER VIA COPY
Now there is new layer, take a close up tube and move it over new layer.
Make sure ''close-up'' layer is selected RIGHT CLICK > CREATE CLIPPING MASK
Click on IMAGE > ADJUSTMENTS > HUE/SATURATION - HUE: 0, SATURATION -100, LIGHTNESS - 0
Click on close up tube layer RIGHT CLICK > DUPLICATE LAYER
Set ''close-up copy'' layer on BLENDING MODE - OVERLAY; go to FILTER > BLUR > LENS BLUR
Now select again FRg_Masques 2_M3 mask layer. Select area around black rectangles with Magic Wand Tool. Press SHIFT while selecting. You will notice that you cannot select whole area around rectangleas
at once, that's why you have to hold SHIFT. SHIFT allows you to select multiple areas as one.
DOESN'T HAVE TO BE PERFECT SELECTION EITHER, AS YOU CAN SEE I LEFT ON PURPOSE SOME GRAY SPOTS. THEY FIT GREY CLOSE UP TUBE WELL.
You selection should look like this:
Move mouse over selected area RIGHT CLICK > LAYER VIA COPY, same as we did first time.
Take Paper_7 from the kit and place it above new layer, resize it if needed.
RIGHT CLICK on Paper_7 layer > CREATE CLIPPING MASK.
Now you should have beautiful lila backgroud.
Marge all layers, except background layer RIGHT CLICK > DUPLICATE.
Apply BLEND MODE ON DUPLICATED LAYER on SOFT LIGHT.
Go to FILTER > BLUR > LENS BLUR.
Add text : Keep calm and smile. I used Qwigley FTU font in color #4b2082
STROKE > SIZE 1 in color white and OUTER GLOW > SIZE 13 color white.
Add your name, I used BOSSHOLE FTU font, white color, STROKE in #be58dc - 1 px size,
OUTER GLOW > SIZE 16, COLOR #b877e1, BLEND MODE > NORMAL
FONT SIZE : 30
Add your copyright information and that is it! I hope you enjoyed and found this tutorial useful.
Hugs.

Subscribe to:
Post Comments
(Atom)
Alex CT For


Marilyn CT For
Check Me!
AD Service
Marilyn AD Service
If you have more questions, or interested in purchasing the product contact me via dina.gaco@hotmail.com; or FACEBOOK Dina Marilyn ...

Favourite Stores


0 comments:
Post a Comment
Leave some love xoxo