Grab Our Blinkie

Groups We Love


Certified

Lifetime Member

Favourite Blogs


Saturday, May 31, 2014
**CT CHICHI DESIGNZ - Pear Fling**
Hello everyone! I have new tag to show off.
Using beautiful PTU kit 'Ice Cream Pear' by Chichi Designz

In this kit you can find 20 elements, 1 WA,
3 frames and 6 papers. Match it with
stunning artwork by Amy Matthews from CDO.
Kit Preview:

-xoxo al3x-

Friday, May 30, 2014
**CT PTU TUTORIAL - Ocean Breeze**
-vm.png)
*This tutorial is written by me using Photoshop CS6 but any version will work.
Any similarity to any other tut is coincidental.*
Supplies:
Tube of choice. I'm using the artwork of Verymany.
You must purchase a license to be able to use their work.
Kit of choice. I'm using PTU kit 'Ocean Breeze'
Mask of choice - WSL_Mask58
Font of choice
Let's get started...
Open new canvas 600x600.
From the kit past Element 20 and place it little left and down from the
center. Drop Shadow with Opacity on 35%. Click the 'background' layer
then. Then add 2 copies of Element 91, one on the top left an other on
right center (around the frame) with shadow on both. Now past Paper 37,
don't resize it! Use Eraser Tool to remove everything outside the frame.
Open tube file and past full size tube, Flip Horizontal and place it at
the left side. Double click on the tube layer and set Blend Mode to
Hard Light. Then click on the frame layer. At the frame bottom place
Element 10, resize to be bigger a little and shadow. On the bottom left
add Element 60, shadow. On it past Elements 18, 36, 28 and 75 in that
order with shadow on all. Then at the right side past Elements 17, 65,
58, 18 and For the frame top left side use Element 100, resize a little,
Flip Horizontal and use Eraser Tool to remove the other branch. Make a
copy of it, Flip Horizontal and place it little down and left from the
original one, shadow on both 35%. At the top of the fist leaves add
Element 33, shadow. From that one till down we'll place Elemens 108,
34 and 51 with shadow on all. Now add full size tube and place it little
right from the center, shadow on 45%. At the tube bottom add Elements
78, 83, 43, 103 and 6 in that order with shadow on all 35% (fallow my
tag to see where to place them).
Now let's add mask:
Open your mask as new image.
Mask layer will be called 'Background' and will be locked.
Double click on same layer, press OK. Layer name will be 'Layer 0'.
Add a new layer above it and flood fill with color of choice,
or use a paper from kit. I use Paper 6.
Click on mask layer and hold CTRL+A to Select All, CTRL+C to Copy.
Click on the paper layer, hit Q to turn on Quick Mask mode.
CTRL+V to paste the mask. It should now be kinda red.
Hit Q to turn off Quick Mask mode
and there should be shown selection on your canvas.
Hit the Add Layer Mask.
On paper layer, right click and Convert to Smart Object.
Right click again and Rasterize Layer.
Drag completed mask to your tag canvas as the bottom layer.
Resize it if needed.
Add proper copyright and your name on tag.
Hide or delete bottom 'Background' layer. And save your tag as .PNG file.
-l.png)
That's it! Thank you for reading. I would love to see any tags made with this tutorial. You can past the link here as comment or send them to me on al3x_v@ymail.com

Saturday, May 24, 2014
**CT PTU TUTORIAL - My Dream**
-vm.png)
*This tutorial is written by me using Photoshop CS6 but any version will work.
Any similarity to any other tut is coincidental.*
Supplies:
Tube of choice. I'm using the artwork of Verymany.
You must purchase a license to be able to use their work.
Kit of choice. I'm using PTU kit 'Dragons Land'
Mask of choice - MB and SW Mask 39
Font of choice - Segoe Script
Let's get started...
Open new canvas 600x600.
From the kit past Element 2, Flip Horizontal and place ti top center, with
Drop Shadow, Opacity 45%. On it add Element 3, shadow. Make a copy of it,
Rotate 180, resize to be smaller and place bottom left side. On the flower
place Element 9 with shadow. Make a copy of it, Rotate 180 and place bottom
right side. Between top and bottom elements we already have add Element 2b
with shadow on 45%. On it past Element 9, resize to be smaller and shadow.
On the flower right side place Element 25 wish shadow. On it add Elements 4
and 4b, shadow on both. At the bottom of those place Element 24, rezise and
shadow. Now at the flower left side first add Element 4, resize and rotate with
Drop Shadow 45%. On it add Elements 12 and 10 with shadow on both. On the
second element resize and place Element 7, shadow. Now go down to
the background layer and click on it. Past 5 copies of Element 15, resize
and rotate all the way you want and place them around the already
placed elements. Drop Shadow on all, with Opacity on 35%. Now go up to
the first layer el7 and click on it. Then open tube .PSD file. Turn off close-up
and all dress layers. You'll turn on layers dress_5 and dress_6. Double click
on dress_6 and set Blend Mode to Screen. Select all 3 layers and group then
or Convert to Smart Object. Then move it to the tag canvas, resize and
Flip Horizontal. Place it at the canvas center. Add shadow to the tube -
Opacity 45%, Distance 3, Size 8 (just for the tube). To cover the tube
bottom use Element 23, resize and shadow on 45%. At the banner
top right side add Elements 9 and 2, resize to be small and shadow on both.
Now let's add mask:
Open your mask as new image.
Mask layer will be called 'Background' and will be locked.
Double click on same layer, press OK. Layer name will be 'Layer 0'.
Add a new layer above it and flood fill with color of choice,
or use a paper from kit. I use Paper 5.
Click on mask layer and hold CTRL+A to Select All, CTRL+C to Copy.
Click on the paper layer, hit Q to turn on Quick Mask mode.
CTRL+V to paste the mask. It should now be kinda red.
Hit Q to turn off Quick Mask mode
and there should be shown selection on your canvas.
Hit the Add Layer Mask.
On paper layer, right click and Convert to Smart Object.
Right click again and Rasterize Layer.
Drag completed mask to your tag canvas as the bottom layer.
Resize it if needed.
Add proper copyright and your name on tag.
Hide or delete bottom 'Background' layer. And save your tag as .PNG file.
-cc.png)
That's it! Thank you for reading. I would love to see any tags made with this tutorial. You can past the link here as comment or send them to me on al3x_v@ymail.com

Friday, May 23, 2014
**CT forum set - Verymany & Dees'Sign Depot**


Monday, May 19, 2014
Verymany - Just an Illusion forum set

New CT tag show off with new Verymany tube called Angie.
She is already in the VMT store and available HERE.
As well Verymany has BIG SALE next 3 days - all Verymany tubes are $1.00.
Awesome isn't it :) Grab some tube while they are cheap.

I used gorgeous PTU scrap kit from Tiny Turtle Designs called Denim Garden.
Kit comes with 160 elements and 56 papers! And it has so many cute clusters inside
for some quick taggies. This kit is must have ladies.
And of course it only costs $.99. You can purchase the kit in TTD store HERE.
Kit preview:

Thank you for stopping by.
Have a nice day. Hugs...

Thursday, May 15, 2014
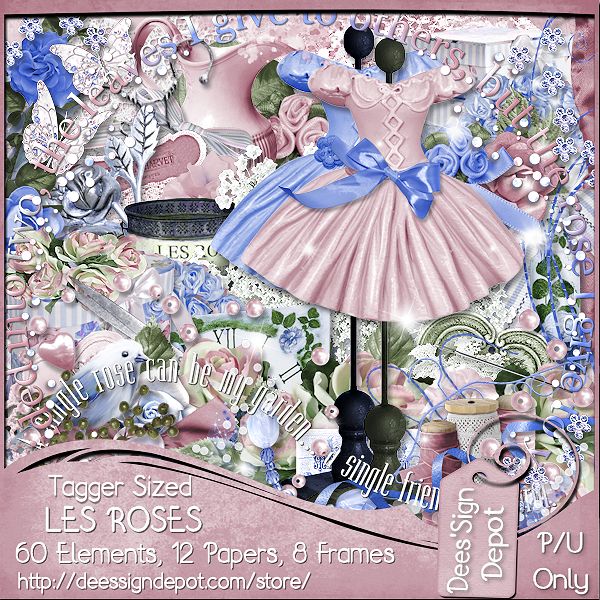
**CT DEES'SIGN DEPOT - Sweetly Refined**
Hello everyone!
My new CT tag and some snags for you.
Showing off my creation with stunning new PTU kit
'Sweetly Refined' by Dees'Sign Depot that

This beauty comes with 80 elements, 9 frames,
9 sprays and 16 papers. It's a must have!
Tube used by The Vintage Angel from CDO store.
Kit Preview:

And as I said, here are some snags for you.
Just right click on them and download.
Please do not alter them or claim as your own.
Thank you...


-xoxo al3x-

Ismael Rac - U Anchor Me

My play with new Rac tube and gorgeous PTU scrap kit from Dees'Sign Depot.
Tube is called 2014 Classic Pose, comes with multiple layers and you can
purchase this beauty in Ismael Rac's store HERE.
This stunning summer kit is called ''U Anchor Me'' and you can purchase
it in Dees'Signe Depot store right HERE.
Kit preview:

Thank you for stopping by. Have a nice day.
Hugs...

Monday, May 12, 2014
**CT tags - Verymany**
Hi all... It's been a while...
I have new CT tags to show you off.
The first one is with stunning tube 'Lillian' by

The second tag is with another tube by
Verymany called 'Eleanor' and this one as well

Both tubes are multilayered. A lot of colors
on both, so you'll be able to mix them
with any kid of scrapkit.
-xoxo al3x-

Thursday, May 8, 2014
Zlata Ma - Summer Morning

New CT tag show off for Dees'Sign Depot.
I used gorgeous PTU scrap it called 'Summer Morning', this kit was inspired
by Zlata M's gorgeous new Summer Morning tube, available HERE.
I didn't used matching tube, but Ashley tube from Zlata M.
She is sold at PFD store. Check Zlata's tubes HERE.
KIT CAN BE FOUND - HERE.

Have a nice day. Hugs...

Subscribe to:
Posts
(Atom)
Alex CT For


Marilyn CT For
Check Me!
AD Service
Marilyn AD Service
If you have more questions, or interested in purchasing the product contact me via dina.gaco@hotmail.com; or FACEBOOK Dina Marilyn ...

Favourite Stores