Grab Our Blinkie

Groups We Love


Certified

Lifetime Member

Favourite Blogs


Showing posts with label Tiny Turtle Designs. Show all posts
Showing posts with label Tiny Turtle Designs. Show all posts
Thursday, October 16, 2014
**CLUSTER FRAME - Fall Friends**
FREEBIE TIME!!!
I have new cluster frame for you.
Used lovely PTU kit 'Fall Friends' by Tiny Turtle Designs

**Please do not share the file or download link.
Link it back to my blog.
Do not add elements from other kits
or claim it as your own,
Thank you**
-vm.png)
For this tag I'm using lovely tube 'Eva' by Verymany
And cause I really, really love this kit, had to
do another tag lol

For this tag I'm using artwork by Jessica Dougherty
from CDO store.
-xoxo al3x-

Friday, September 26, 2014
**CT TINY TURTLE DESIGNS - Fall Flowers**
Hello, hello :)
I have new CT tags to show off with lovely PTU kit
'Fall Flowers' by Tiny Turtle Designs that you

My 2nd tag with this lovely kit is FB timeline banner.

This's a fun fall kit that comes with 135 elements and
35 papers. With green and orange tones.
Kit Preview:

-xoxo al3x-

Wednesday, September 17, 2014
**CT PTU TUTORIAL - Vamp Night**
-vm.png)
*This tutorial is written by me using Photoshop CS6 but any version will work.
Any similarity to any other tut is coincidental.*
Supplies:
Tube of choice. I'm using the artwork of Verymany.
You must purchase a license to be able to use their work.
Kit of choice. I'm using PTU kit 'Darkest Night'
Template of choice - DD_Temp_Behave
Mask of choice - WSL_Mask3
Font of choice - PR-Uncial Creepy
Let's get started...
Open template and hide or delete info layer. Go and click on the
last layer - red bottom rectangle. From the kit past Paper 26, right
click on the paper layer and Create Clipping Mask. Make a copy of
that layer and move it above red top rectangle layer. Roate paper for
180 and make CC mask. For the purple bottom rectangle use Paper 15
for CC mask. Click on the layer purple top rectangle and past Paper 17,
right click on the layer and CC mask. For white circle use Paper 20.
Then click on the layer purple circle and use Paper 2 for CC mask.
At the top right corner place Element 22, resize to be bigger and if
needed use Eraser Tool to remove extras. Past Element 191 and place it
at the canvas left side, Drop Shadow with Opacity on 35%. On it add
Element 150, shadow. Now behind left top circle place Element 39.
Click on the layer large yellow circle and use Paper 6 for CC mask.
Open the tube and place close up in the circle. Create Clipping Mask
with the tube layer and set Blend Mode to Overlay with Opacity on 75%.
You'll get that rustic effect on the tube. Then hide or delete layers:
yellow circles grouping and dotted circles grouping. Now from the kit
past Element 84, resize and place it to the right side, right under the
moon, shadow. On it add Element 150 with shadow on 35%. Then on those
two place Elements 159, 191 and 192 in that order with shadow on all.
Now at the canvas bottom place 2 copies of Element 73, no shadow.
Place full size tube then and erase a little of her legs. Make a copy
of tube layer. For the original tube layer add Drop Shadow with
Opacity on 55%. And for the tube copy layer add Filter - Gaussian Blur
5,0 pix and set Blend Mode to Overlay with Opacity on 45%. Now at the
bottom of the canvas place 3 copies of Element 107, shadow on 35%.
Above it, at the right side, place Element 120 with shadow. And on the
left side Element 180. On both of them add a copy of Elements 84 and 150
with shadow on all. Now between those past Element 154, shadow. On it
place Element 6 and at the bottom right Element 11 with shadow on both.
Now we gonna add some elements on the freame around the rustic close
up tube. For that use Elements 150, 84 (x2) and 122 with shadow on all.
Click on the layer behive options white and add Stroke - size 1, color
black and Color Overlay - red (c50000). The other one leave as it is.
Now let's add mask:
Open your mask as new image.
Mask layer will be called 'Background' and will be locked.
Double click on same layer, press OK. Layer name will be 'Layer 0'.
Add a new layer above it and flood fill with color of choice,
or use a paper from kit. I use Paper 25.
Click on mask layer and hold CTRL+A to Select All, CTRL+C to Copy.
Click on the paper layer, hit Q to turn on Quick Mask mode.
CTRL+V to paste the mask. It should now be kinda red.
Hit Q to turn off Quick Mask mode
and there should be shown selection on your canvas.
Hit the Add Layer Mask.
On paper layer, right click and Convert to Smart Object.
Right click again and Rasterize Layer.
Drag completed mask to your tag canvas as the bottom layer.
Resize it if needed.
Add proper copyright and your name on tag.
Hide or delete bottom 'Background' layer. And save your tag as .PNG file.
-l.png)
That's it! Thank you for reading. I would love to see any tags made with this tutorial. You can past the link here as comment or send them to me on al3x_v@ymail.com

Sunday, August 24, 2014
PTU TUTORIAL - LITTLE BLACK DRESS

This tutorial was written by me on July 19, 2014 using Photoshop CS6 but any version will work.
Any resemblance to any other tutorial is pure coincidence.
SUPPLIES:
I used the artwork of Verymany. Tube can be purchased HERE.
You must purchase a license to be able to use their tubes.
I used PTU kit Vintage Romance from Tiny Turtle Designs. You can buy it HERE.
PTU CLUSTERS Vintage Romance made by me. You can buy it HERE.
I used Mask from Fall3n Angel. Edge Mask 3 which can be downloaded HERE.
Template by Pooker from Elegant Inspirations, can be downloaded HERE.
Fonts - I used AMATIC SC font for name and NOTALOT25 for pixel ELEGANT wordart.
Wordart I used - right click - save as.

Open tube, hide all layers except dress_4 and girl/tube layer.
Select dress_4 layer and click on IMAGE > ADJUSTMENTS > brightness/contrast.
Apply settings like on the image below, then click OK:

Open template. Remove INFO layer.
Fill out template with papers from the kit. I used:
Paper (30) - for ALL BROWN CIRCLES. And use same paper for ''Blue Glitter Circle''.
Paper (15) - for CREAM CIRCLES, leave ''Cream Circle1'' as it is., do not apply this paper on it.
Paper (12) - for ALL GREEN CIRCLES. And use same paper for ''Cream Circle1'.
Apply grey color #32373b on all BROWN DOTTED CIRCLES.
Apply same grey color #32373b on Cream Strips1.
Apply purple color #a296ba on Cream Strips2.
Apply shadow on each retangle as follows:

Do NOT apply shadow on dotted circles and strips...
Open tube file on which we worked earlier. Select dress_4 and girl holding SHIFT.
RIGHT CLICK > MERGE LAYERS. Move the tube on the tag.
We are going to place tube in the Tri Color Rectangles . Leave tube size as it is.
Place the tube like shown below. RIGHT CLICK > CREATE CLIPPING MASK.
SELECT Tri Color Rectangles layer, select MAGIC WAND TOOL (left side, vertical tab).
Mark first rectangle from the right.
Now SELECT tube layer, move mouse over selected area, RIGHT CLICK > LAYER VIA COPY.
NOW YOU SHOULD HAVE NEW LAYER.
Select original tube, move it on the left side, do the same what we did first time.
In this case select middle rectangle.
Do the same with the third rectangle. In this case select third rectangle.

After you have all 3 rectangles filled, delete original tube layer - one we used to
make those squares. We don't need it anymore.
Holding SHIFT select all 3 tube rectangles, RIGHT CLICK > MERGE LAYERS.
Click on IMAGE > ADJUSTMENTS > HUE/SATURATION.
Apply settings like on the image below, then click OK:

RIGHT CLICK > DUPLICATE LAYER. SET BLENDING OPTIONS TO OVERLAY.
GO TO FILTERS > BLUR > LENS BLUR.
MERGE BOTH LAYERS.
Add tube on the tag, place it on the left side, as you can see on the tag.
Click on IMAGE > ADJUSTMENTS > HUE/SATURATION.
Apply settings like on the image below, then click OK:

RIGHT CLICK > DUPLICATE LAYER. SET BLENDING OPTIONS TO SOFT LIGHT.
GO TO FILTERS > BLUR > LENS BLUR.
MERGE BOTH LAYERS.
Create new empty layer underneath the tube.
COLOR PICKER > #454544. Hard Round brush. (Left tab)
Draw a bold line underneath the tube. Apply FILTERS > BLUR > LENS BLUR 10x.
Leave layer OPACITY on 100%. Thats's it.

Take a CLUSTER 2 from the folder and add it on the tag, below Tri Color Rectangles layer.
Add tube close_up in the frames. I applied same effects like on the Tri Rectangle close_up tubes.
In this case, you cannot use Magic Wand Tool, beacuse cluster is premade and already has
shadow on it so if you use MWT close up tubes won't end up right and clean inside the frame.
Use Eraser Tool instead.
As well I used Cluster1a underneath CLUSTER 2 and behind the tube.
Add few elements from the kit. *Use my tag as guidance.
Apply shadow on each element as follows:

Add wordart in front of the tube.
Now add mask on the tag. Open your mask. IMAGE > ADJUSTMENTS > INVERT.
Mask layer will be called 'Background' and will be locked.
Double click on same layer, press OK.
Add a new layer above it and flood fill with color of choice, or use a paper from kit.
I used Paper (16).
Click on mask layer and hold CTRL+A to Select All, CTRL+C to Copy.
Click on the paper layer, hit Q to turn on Quick Mask mode.
CTRL+V to paste the mask. Hit Q to turn off Quick Mask mode
and there should be shown selection on your canvas. Hit the Add Layer Mask.
On paper layer, right click and Convert to Smart Object.
Right click again and Rasterize Layer. Drag completed mask to your tag canvas as the bottom layer.
Resize it if needed.
Marge all layers, except background layer. RIGHT CLICK > DUPLICATE.
Go to FILTER > SHARPEN > SHARPEN.
Click on IMAGE > ADJUSTMENTS > HUE/SATURATION.
SATURATION : -10.
Add your name, I used AMATIC SC font in BLACK color, OUTER GLOW in white color
OUTER GLOW > SIZE 5, BLEND MODE > NORMAL
FONT SIZE : 55
Add your copyright information and that is it! I hope you enjoyed and found this tutorial useful.
Hugs

Wednesday, August 20, 2014
**CLUSTER FRAME - Baby Boy**
Another freebie alert! I was so inspired with this kit
and decided to make a cluster and share it with all of you ♥
I'm using lovely PTU kit 'Baby Boy' by Tiny Turtle Designs

**Please do not share file or download link.
Link it back to my blog.
Do not add elements from other kits
or claim it as your own.
Thank you**

For this tag I'm using lovely tube by Zindy.
-xoxo al3x-

Monday, August 11, 2014
HIGH ON SUMMERTIME PTU TUTORIAL

This tutorial was written by me on July 19, 2014 using Photoshop CS6 but any version will work.
Any resemblance to any other tutorial is pure coincidence.
SUPPLIES:
I used the artwork of Verymany. Tube can be purchased HERE.
You must purchase a license to be able to use their tubes.
I used PTU kit Beach Parfait from Tiny Turtle Designs. You can buy it HERE.
I used Mask from Fall3n Angel. Edge Mask 3 which can be downloaded HERE.
Template by Dees'Sign Depot, can be downloaded HERE.
Fonts - I used SIGNERICA FAT FTU font.
Summer Overlay and labels created by me, can be downloaded HERE.
xxx
Open tube, hide all clothes layers except skirt_3 and girl/tube layer.
Select skirt_3 layer and click on IMAGE > ADJUSTMENTS > HUE/SATURATION.
Apply settings like on the image below, then click OK:
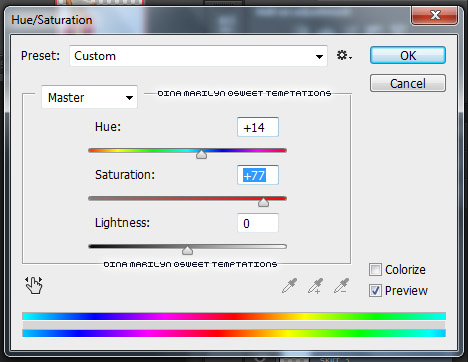
Open template. Remove INFO layer.
Select Orange Summertime layer, double click on it > select COLOR OVERLAY
apply pink color #e2083f. Select Orange High On layer, double click on it > select COLOR OVERLAY apply pink color #e2083f.
Select Rt small dotted circle layer, double click on it > select COLOR OVERLAY apply pink color #e2083f. Select Lft small dotted circle layer, double click on it > select COLOR OVERLAY apply pink color #e2083f.
Select Center orange circle layer, double click on it > select COLOR OVERLAY apply
pink color #fc0040. RIGHT CLICK > RASTERIZE LAYER STYLE. Move on the tag ''SUMMER OVERLAY'' I gave you before, RIGHT CLICK > CREATE CLIPPING MASK.
Select Center dotted circle layer, double click on it > select COLOR OVERLAY apply pink color #e2083f.
Fill Orange Oval with Paper (3) from the kit.
Select Bottom orange strip layer, double click on it > select COLOR OVERLAY apply pink color #fc0040. RIGHT CLICK > RASTERIZE LAYER. Double click, select STROKE > appy white color, size 3. Select Top orange strip layer, double click on it > select COLOR OVERLAY apply pink color #fc0040. RIGHT CLICK > RASTERIZE LAYER. Double click, select STROKE > appy white color, size 3. Appy ''SUMMER OVERLY'' on both strips, like we did with Center orange circle layer.
Select Bottom squares bg layer, double click on it > select COLOR OVERLAY apply pink color #e2083f. Apply Blend Mode > COLOR.
Select Top squares bg layer, double click on it > select COLOR OVERLAY apply pink color #e2083f. Apply Blend Mode > COLOR.
Take close-up tube and put it on the template. Move it down to the end of layer palette,
right before Right white square layer. RIGHT CLICK > CREATE CLIPPING MASK.
Place it as you wish, I placed it on the right side. Duplicate close-up layer, it it already set as clipping mask. If not, do the same as we did with first layer. Move duplicated layer more on the left side to cover white rectangle completely. Select both close-up layers holding CTRL. RIGHT CLICK > MERGE LAYERS.
DUPLICATE close-up layer. Apply Blending Mode to SCREEN. FILTERS > BLUR >
LENS BLUR > OK.
^ Do the same steps with LEFT WHITE SQUARE, as we did with RIGHT WHITE SQUARE.
right before Right white square layer. RIGHT CLICK > CREATE CLIPPING MASK.
Place it as you wish, I placed it on the right side. Duplicate close-up layer, it it already set as clipping mask. If not, do the same as we did with first layer. Move duplicated layer more on the left side to cover white rectangle completely. Select both close-up layers holding CTRL. RIGHT CLICK > MERGE LAYERS.
DUPLICATE close-up layer. Apply Blending Mode to SCREEN. FILTERS > BLUR >
LENS BLUR > OK.
^ Do the same steps with LEFT WHITE SQUARE, as we did with RIGHT WHITE SQUARE.
Click on second window/canvas where your tube is. Select skirt_3 and girl holding SHIFT.
RIGHT CLICK > MERGE LAYERS. Move the tube on the tag.
Move it to the end of layer palette, right before Top squares layer. We are going to place tube in the squares. Leave tube size as it is. Place the tube like shown below.
RIGHT CLICK > CREATE CLIPPING MASK.
SELECT Top squares layer, select MAGIC WAND TOOL (left side, vertical tab).
Mark first square from the right.
Now SELECT tube layer, move mouse over selected area, RIGHT CLICK > LAYER VIA COPY.
NOW YOU SHOULD HAVE NEW LAYER, SQUARE PHOTO.
Select original tube, move it on the left side, do the same what we did first time.
In this case select middle square.
Do the same with the third square. In this case select third square.

After you have all 3 squares filled, delete original tube layer - one we used to make those squares. We don't need it anymore.
Holding SHIFT select all 3 tube squares, RIGHT CLICK > MERGE LAYERS.
RIGHT CLICK > DUPLICATE LAYER. SET BLENDING OPTIONS TO OVERLAY.
GO TO FILTERS > BLUR > LENS BLUR.
Merge both layers - normal tube squares and blended.
DUPLICATE THEM. Move duplicated layer above Bottom squares.
We are going to place those tube squares in bottom frames.
We won't do same steps over again.
It is waste of the time and bottom and top squares may look different. So we won't risk.
Now move tube squares to the bottom of the tag. Like on the image below.
Make sure it matches the frames.

Add shadow on each rectangle, as follows:
Do not add shadow on dotted circles.
As well add shadow only on White oval, Top squares bg and Bottom squares bg.
Leave Orange Oval, Bottom and top squares as it is.

Okay, now we are going to add tube on the tag. Finally right? :)
If you merged the tube when I told you to do so, layer is called skirt_3 probably.
Move the tube on the tag. Move layer to the top, above Rt small dotted circle layer.
Make sure template wordart is visable and clean.
Make sure your tube layer is selected, hold CTRT + T.
At the top you will see new tab, underneath Options tab.
At the moment setting are as follows W: 100% and H: 100%
Change them to W: 50% and H: 50%. Press ENTER.
Place tube in the middle, as you can see on the tag above.
Select Eraser Tool > set on Soft Round Brush, any size.
Remove just a bit of girl's legs. We don't want to have clear lines there.
Like on the image below:

DUPLICATE tube, move it underneath original tube layer.
Recolor layer into dark grey color #2d2a2a. OK. Make sure that layer is selected.
Click on EDIT > TRANSFORM > DISORT > make settings as follows:


Press ENTER. Now clik on FILTER > BLUR > LENS BLUR > OK
Hold CTRL +F to repeat same effect. It should be applied 2 times.
Now move your mouse over layer palette and click on OPACITY - 60%.
That's it.
Now add elements from the kit. *Use my tag as guidance.
I used just a couple of elements, and KEEP CALM labels which were created by me.
I applied shadow on each element like this:

Now add mask on the tag. Open your mask. IMAGE > ADJUSTMENTS > INVERT.
Mask layer will be called 'Background' and will be locked.
Double click on same layer, press OK.
Add a new layer above it and flood fill with color of choice, or use a paper from kit. I used Paper (13).
Click on mask layer and hold CTRL+A to Select All, CTRL+C to Copy.
Click on the paper layer, hit Q to turn on Quick Mask mode.
CTRL+V to paste the mask. Hit Q to turn off Quick Mask mode
and there should be shown selection on your canvas. Hit the Add Layer Mask.
On paper layer, right click and Convert to Smart Object.
Right click again and Rasterize Layer. Drag completed mask to your tag canvas as the bottom layer.
Resize it if needed.
Okay.
Marge all layers, except background layer. RIGHT CLICK > DUPLICATE.
Apply BLEND MODE ON DUPLICATED LAYER on SOFT LIGHT.
Go to FILTER > BLUR > LENS BLUR.
Add your name, I used SIGNERICA FAT FTU font in yellow color, OUTER GLOW in pink color
OUTER GLOW > SIZE 18, BLEND MODE > NORMAL
FONT SIZE : 60
Add your copyright information and that is it! I hope you enjoyed and found this tutorial useful.
Hugs

Tuesday, July 29, 2014
**CT tags - Verymany & Tiny Turtle Designs**
Hi everyone! It's been a while...
But I have two new CT tags to show off.
In both I'm using lovely tube 'Tiffany' by Verymany

I match this beauty with kit 'Magical Spring' by
Tiny Turtle Designs that you can fin on

This kit comes with 152 elements and 27 papers.
Lovely kit with a lot of flowers.
Kit Preview:

-xoxo al3x-

Thursday, July 17, 2014
Strawberry PTU tutorial

This tutorial was written by me on July 18, 2014 using Photoshop CS6 but any version will work.
Any resemblance to any other tutorial is pure coincidence.
SUPPLIES:
I used the artwork of Verymany. Tube can be purchased HERE.
You must purchase a license to be able to use their tubes.
I used PTU kit Strawberries from Tiny Turtle Designs. You can buy it HERE.
Template - I used Pooker's template EI#209 - download it HERE
I used Mask from Fran. Masques 2/Masks 2 which can be downloaded HERE.
Fonts - I used SNF Ambrosia PTU, Will&Grace FTU and Singerica Fat FTU font.
Wordart; right click on it and save as:
*Personal use only, can be used for writing tutorials or creating any other tag,
if you use this wordart freebie in your tutorial, link back to my blog. Thank you*

Go to IMAGE > IMAGE SIZE > WIDTH/HEIGHT : 600.
Now lets fill out template with papers from the kit.
I used - Paper 17; I filled out all brown parts with this paper
Paper 22, I filled out all cream parts with this paper
Paper 16, I filled out all green parts with this paper
Paper 10, I filled out all blue parts with this paper
I applied on EACH rectangle WHITE STROKE > SIZE 3,
DROP SHADOW > DISTANCE - 0 , SPREAD - 0, SIZE - 10.
I recolored Arrows in RED COLOR #c00f13, I took red color from the Paper 17.
Open the tube. Close all layers except original tube and ''dress_3'' layer.
Select ''dress_3''layer, IMAGE > ADJUSTMENTS > HUE/SATURATION - HUE: +15, SATURATION +52, LIGHTNESS - -9
Click OK.
Again click on IMAGE > ADJUSTMENTS > LEVELS > INPUT LEVELS > 0 - 0,31 - 255. OK
Again click on IMAGE > ADJUSTMENTS > LEVELS > INPUT LEVELS > 0 - 0,31 - 255. OK
Final step IMAGE > AUTO TONE for more realistic look.
Marge all layers. Paste tube on already filled template.
Make sure your tube layer is selected, hold CTRT + T.
At the top you will see new tab, underneath Options tab.
At the moment setting are as follows W: 100% and H: 100%
Change them to W: 45% and H: 45%. Press ENTER.
Place tube in the middle, as you can see on the tag above.
DUPLICATE tube, move it underneath original tube layer.
Recolor layet into dark grey color #2d2828. OK. Make sure that layer is selected.
Click on EDIT > TRANSFORM > DISORT > make settings as follows
X:280,00 PX, Y:312,50 PX, W:109,39%, H 100,26, ANGLE -5,39°, H:+9,25
Press ENTER. Now clik on FILTER > BLUR > LENS BLUR > OK
Hold CTRL +F to repeat same effect. It should be applied 2 times.
Now move your mouse over layer pallete and clik on OPACITY - 80%.
That's it.
Now let's add some elements from the kit.
I applied on each elements DROP SHADOW as follows:
BLEND MODE > MULTIPLY
OPACITY > 50%
ANGLE > -40
DISTANCE > 5
SPREAD > 0
SIZE > 9
Use my tag as guidance when adding elements.
After you placed all elements over the template, add wordart on the very top of the layer palette.
In case if you wanna know - I used SNF Ambrosia PTU and Will&Grace FTU font.
Add your name, I used Singerica Fat FTU font, color red, white stroke 1 px size,
OUTER GLOW > SIZE 5, COLOR WHITE
DROP SHADOW > DISTANCE: 5, SPREAD: 0, SIZE: 9
FONT SIZE : 40
Add mask. I used FRg_Masques 2_M4 AND FRg_Masques 2_M5.
First I added FRg_Masques 2_M5 on right top and left bottom corner as base. I used Paper 35.
Marged it all together. Then I added FRg_Masques 2_M4 mask random over the first mask,
I used same paper. Merged both masks together. Added Paper 16 to the mask to make it lighter.
Used Eraser tool and deleted with it some random parts to get kind of a gradient effect.
Marge all layers, except your name, RIGHT CLICK > DUPLICATE.
Apply BLEND MODE ON DUPLICATED LAYER on SOFT LIGHT.
Go to FILTER > BLUR > LENS BLUR.
Add your copyright information and that is it! I hope you enjoyed and found this tutorial useful.
Hugs.

Friday, July 11, 2014
**Cluster Frame - Tropical Summer**
Guess what?! It's freebie time!!!!
I made new cluster for you with lovely PTU kit
'Tropical Summer' by Tiny Turtle Designs.

**Please do not share file or download link.
Link it back to my blog.
Do not add elements from other kits
or claim it as your own.
Thank you**
.png)
Tube used is from Alex P from PFD store.
Hope you like this frame and will enjoy it.
-xoxo al3x-
Sunday, June 29, 2014
**CT PTU TUTORIAL - Beauty**
-vm.png)
*This tutorial is written by me using Photoshop CS6 but any version will work.
Any similarity to any other tut is coincidental.*
Supplies:
Tube of choice. I'm using the artwork of Verymany.
You must purchase a license to be able to use their work.
Kit of choice. I'm using PTU kit 'Vintage Beauty'
Mask of choice - FM2
Font of choice - Corinthia
Let's get started...
Open new canvas 600x600.
Place full size tube at the center. Make copy of that layer. On original
tube layer add Filter: Paint Daubs - Brush Size 1, Sharpness 1 and Drop
Shadow, Opacity 55%. For the tube copy layer add Filter: Gaussian Blur -
5,0 pix and set Blend Mode to Screen with Opacity on 40%. Now go down
and click on background layer. From the kit past Element 96 and place it
on the tube right size, resize and Drop Shadow, Opacity 45%. On the tube
left side place Element 97, shadow. Click background layer again and past
Element 48, Flip Horizontal so the empty part be on the tube right side.
To cover the empty space use Paper 7 and tube set on Hard Light with
Opacity on 65% (those two layers are under the element layer). For the
Element 48 add shadow on 45%. On it place Element 6, resize and shadow.
Now go up where your layers are and click on Element 97. From the kit
past Element 33 and place it on the top left card corner, shadow. At the
bottom corner add Element 16, shadow. On it past Element 7 with shadow.
At the bottom right card corner place Element 99, rotate a little and
shadow. On the right card, behind the tube, place Element 29, shadow.
At the top of right card add Element 77, shadow. On it add Elements
29 and 83, with shadow on both. At the canvas center past Element 99
and left from it another one, shadow on both. On the other one add
Element 107, shadow. At the bottom place Element 78 and on it Element
76 with shadow on both. Then at the bottom right past Element 86. Add 2
copies of Element 20, one on the left and other on the right tube side,
no shadow. Under the tube place Element 80, shadow. Now click on the
first layer, tube copy, and add Elements 71, 86, 81 and 6 in that order.
Now let's add mask:
Open your mask as new image.
Mask layer will be called 'Background' and will be locked.
Double click on same layer, press OK. Layer name will be 'Layer 0'.
Add a new layer above it and flood fill with color of choice,
or use a paper from kit. I use Paper 11.
Click on mask layer and hold CTRL+A to Select All, CTRL+C to Copy.
Click on the paper layer, hit Q to turn on Quick Mask mode.
CTRL+V to paste the mask. It should now be kinda red.
Hit Q to turn off Quick Mask mode
and there should be shown selection on your canvas.
Hit the Add Layer Mask.
On paper layer, right click and Convert to Smart Object.
Right click again and Rasterize Layer.
Drag completed mask to your tag canvas as the bottom layer.
Resize it if needed.
Add proper copyright and your name on tag.
Hide or delete bottom 'Background' layer. And save your tag as .PNG file.
-l.png)
That's it! Thank you for reading. I would love to see any tags made with this tutorial. You can past the link here as comment or send them to me on al3x_v@ymail.com

Subscribe to:
Posts
(Atom)
Alex CT For


Marilyn CT For
Check Me!

AD Service
Marilyn AD Service
If you have more questions, or interested in purchasing the product contact me via dina.gaco@hotmail.com; or FACEBOOK Dina Marilyn ...

Favourite Stores


